The Electronics and Final Assembly
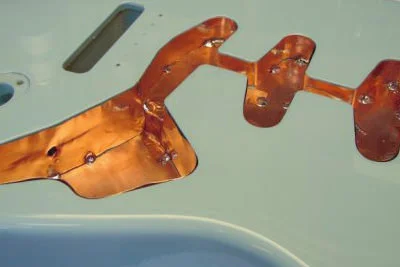
The body’s electronics cavities are shielded, I use real copper sheet, not the adhesive backed copper foil some use. Mine is sheet metal, cut to fit and soldered into place. I never use shielding paint, really, I cannot conceive of such a thing.
Once the shielding is complete, the guitar moves into multiple processes because assembly and installation of the electronics are symbiotic to each other.
I will mount the neck temporarily to position it relative to the bridge and/or tremolo and the pickguard. Notice, even on very expensive custom guitars the bridge and pickguard are often crooked relative to each other, or the spaces are not symmetrical. Not on my babies.
Once the correct positions, visually and physically are determined, the pickguard mounting holes are marked and pilot holes drilled, same with the tremolo and/or bridge.
I will now mount the bridge/tremolo, get the spring tension approximated, solder the ground wire, mount the string ferrules, flush, something rarely seem on a non OEM custom, and mount the neck.
The S pickguard assembly has already been assembled, but I’ll go over what I do. First I always use the ‘60s style pickguard shield, no aluminum tape here.
The pickups selected are mounted, and the leads secured. The pots and switch are mounted and wiring begins. I always using vintage style cotton covered leads and silver solder, no, not the jeweler’s type, the electrically superior type used by all of the superb electronics manufacturers that will accept only uncompromising quality. I also incorporate audio grade capacitors and resistors where necessary.
Unless you have specified a unique electronics circuit, I will use the traditional, relative to type of guitar, circuit. On the S I use an isolated ground point which greatly quiets the beast while preserving exactly the sound we all have come to love so much.

The signal leads are connected from the jack, which is always an original Switchcraft, remaining ground points are connected, the pickups are connected and it’s all mounted and screwed down tight. I’ll plug it into an amp to be certain I’m not going to be surprised later.
Most guitar manufacturers will throw on a set of strings, chunk her in a case and ship it out as complete. Not in my operation, I still have about a week of work to go.
Now I will string it up. Once under tension I recheck the truss rod adjustment, and the tremolo spring tension, if applicable. I’ll rough in the pickup heights and note the string relief over the pickguard, and correct if necessary.
Now I check intonation for the first time. Once set, I attack the nut, cutting and re-cutting each slot until optimum action is realized in low register. Once I’m happy, it’s on to the bridge, now I adjust each saddle until the strings begin to buzz at the 15 th fret, then back them off about a turn, then recheck intonation and tremolo spring tension.

Now I can give the truss rod the final adjustment, to bring the action down to amazing speed. Remember, how low the action can be is directly relative to your skill and playing style.
At this point I will sit it aside for a day or so to adjust to the string’s tension and the new parameters it has to get used to.
The following day I will pretty much repeat the complete process, and then begin playing the guitar, this invariably reveals slight anomalies that I will eliminate with re-adjustment. After several days of playing and adjusting, I will consider it ready to go…
For an in depth experience of how I build guitars, be sure to check out the Build Walkthroughs